Shoot 12
Artist Influence - Nadege Meriau


When further exploring the idea of Nadege Meriau's work and looking at roots I am mainly inspired by the roots within her photos. I like the use of soil and dirt to add texture to the image. Specifically during this shoot I would like to focus on the idea of destruction within the roots of flowers. I feel as though she incorporates this within her photos by making the soil look as though it has been thrown over the backgound and almost looks as if the flower has been pulled straight from the ground. I would like also like to look at the contrast between the fresh flower and the broken and destructed roots.

During this shoot I have decided to expand upon the ideas that I already looked at by looking at some of Nadege Meriau's series that she created. The image above is a photo of honeycomb that she has taken from an interesting perspective in order to make the viewer question what is actually being taken. I would like to build upon the idea of manipulating objects to make photos seem more unique and different. Whilst doing this I want to keep with the idea of looking at the roots of plants.
Contact Sheet


This shoot has been successful because I have explored the use of soil and roots within pictures in more depth and also in dfferent ways than I previously have within my project. I feel as though during this shoot Iahe successfully expanded upon my inspiration from Nadege Meriau's work. An unsuccessful element of this shoot is that due to holding the camera by hand and not using a tripod I found some issues with me being in the way of the light sources resulting in some of the photos being slightly too dark.
My Best Images

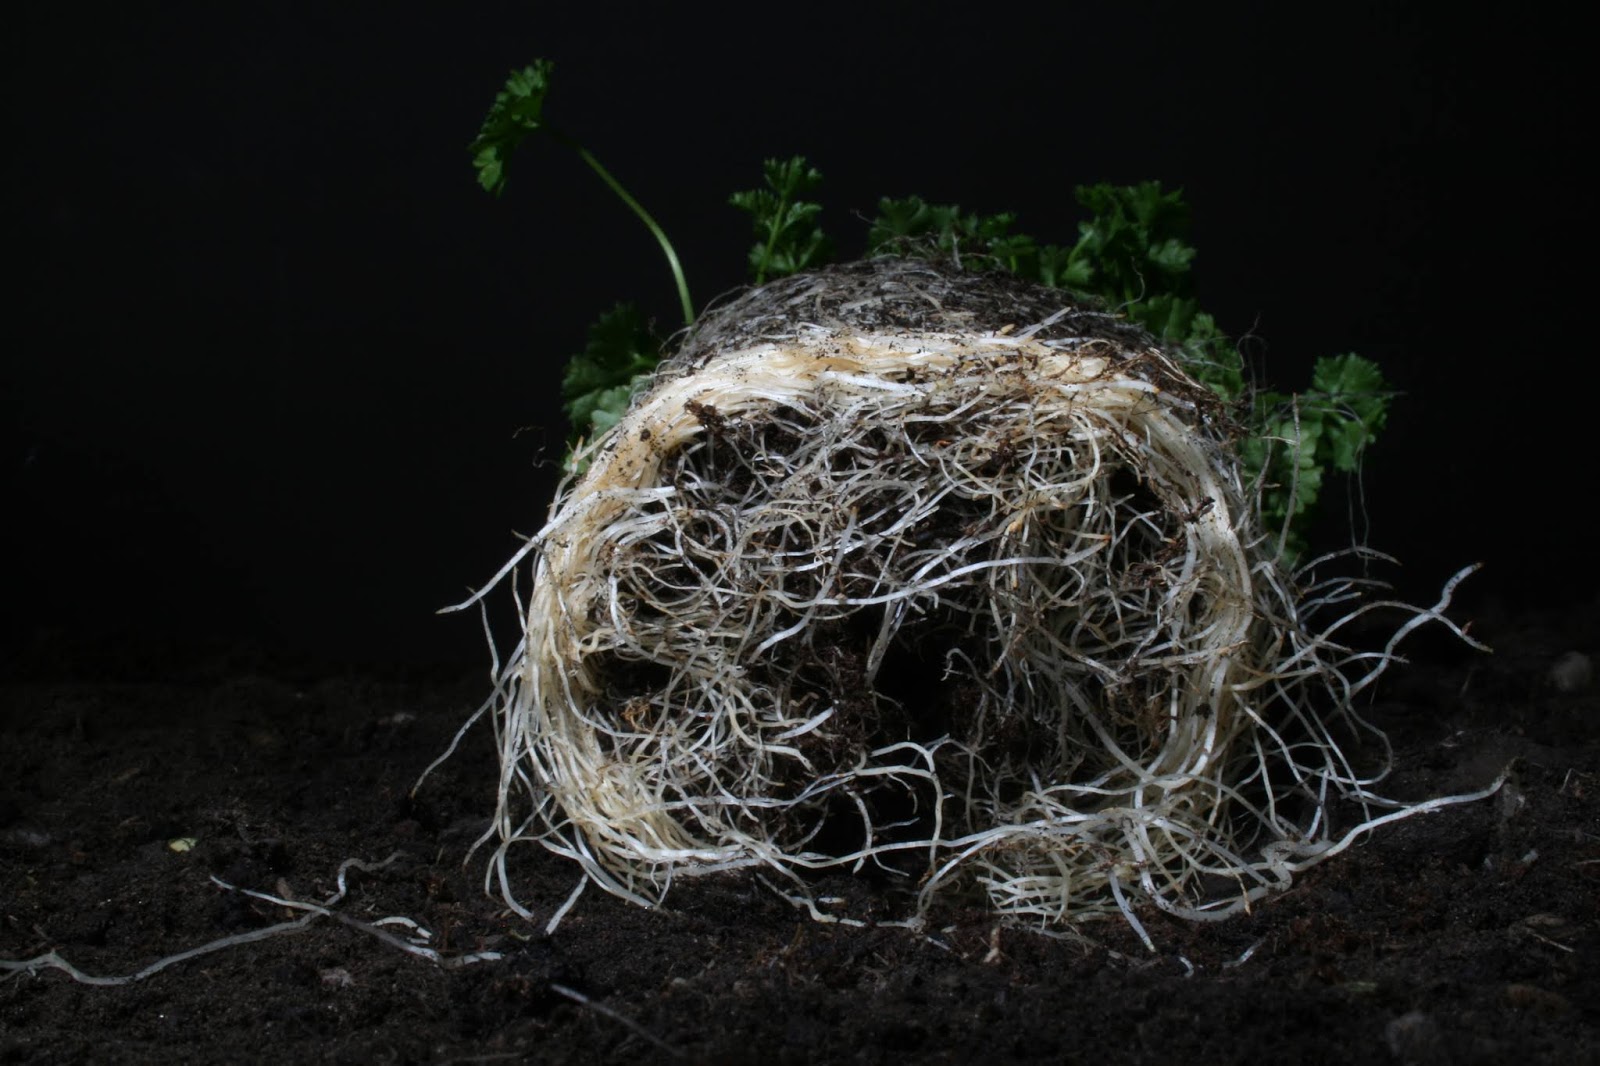
F/29 1/125 ISO 200
I have chosen this image because I like the composition of the photo. I like the way the main focus of the image is on the roots of the image. I also like the contrast between the roots of the two different plants. I also like the shadow that has been created by the leaf of one plant resting in front of the other. I think this creates a harsh shadow within the photo and makes the lighter areas surrounding the shadow stand out.

F/29 1/125 ISO 200
I have chosen this as one of my best images because I like the use of shadows and the composition of the image. When taking this photo I decided to move the snoot lighting attachment to the right side of the plant which projected the light onto the plant from a different angle. This resulted in parts of the plant being in darkness which I like because I think it gives the photo a sense of mystery.

F/22 1/125 ISO 200
I have chosen the image above as one of my best images because I like the busy composition that I created. I think that this is different to many of the other photos that I have taken because they mainly focus on one plant however this one includes three different plants that take up a large part of the frame of the image.

F/22 1/125 ISO 200
I have chosen the image above as one of my best images because I like the use of shape and shadows within the image. I feel as though the leaves of the plant create an interesting shape and the detailed texture of the leaves gives the photo many intricate details. I do like the way the light in the photo is projected onto the plant from the right side of the photo. I think that this is effective as it creates harsh shadows and gives the photos a sense of mystery.

F/22 1/125 ISO 200
I have chosen this as one of my best images because the way that I placed the plant is very eye catching and unique. I feel as though the way the leaves are pointing upwards it gives the effect of the plant sitting in a bowl. By turning the plant upside down it contradicts the 'normal' photos of flowers you usually see therefore I like the unique element to this image.

F/22 1/125 ISO 200
I like the image above due to the roots within the plant. The roots in this plant are very white and stand out within the image. I also like the way the purple flowers compliment the white roots.

F/22 1/125 ISO 200
I have chosen this as one of my best images because I like the composition of the image. I like the creative way the objects have been placed within the frame of the image. I also like the way I have included negative space surrounding the plant because this allows people to see all the details within the plant. I also like the way the green and purple within the photo stands out as they are the only saturated colours in the photo.

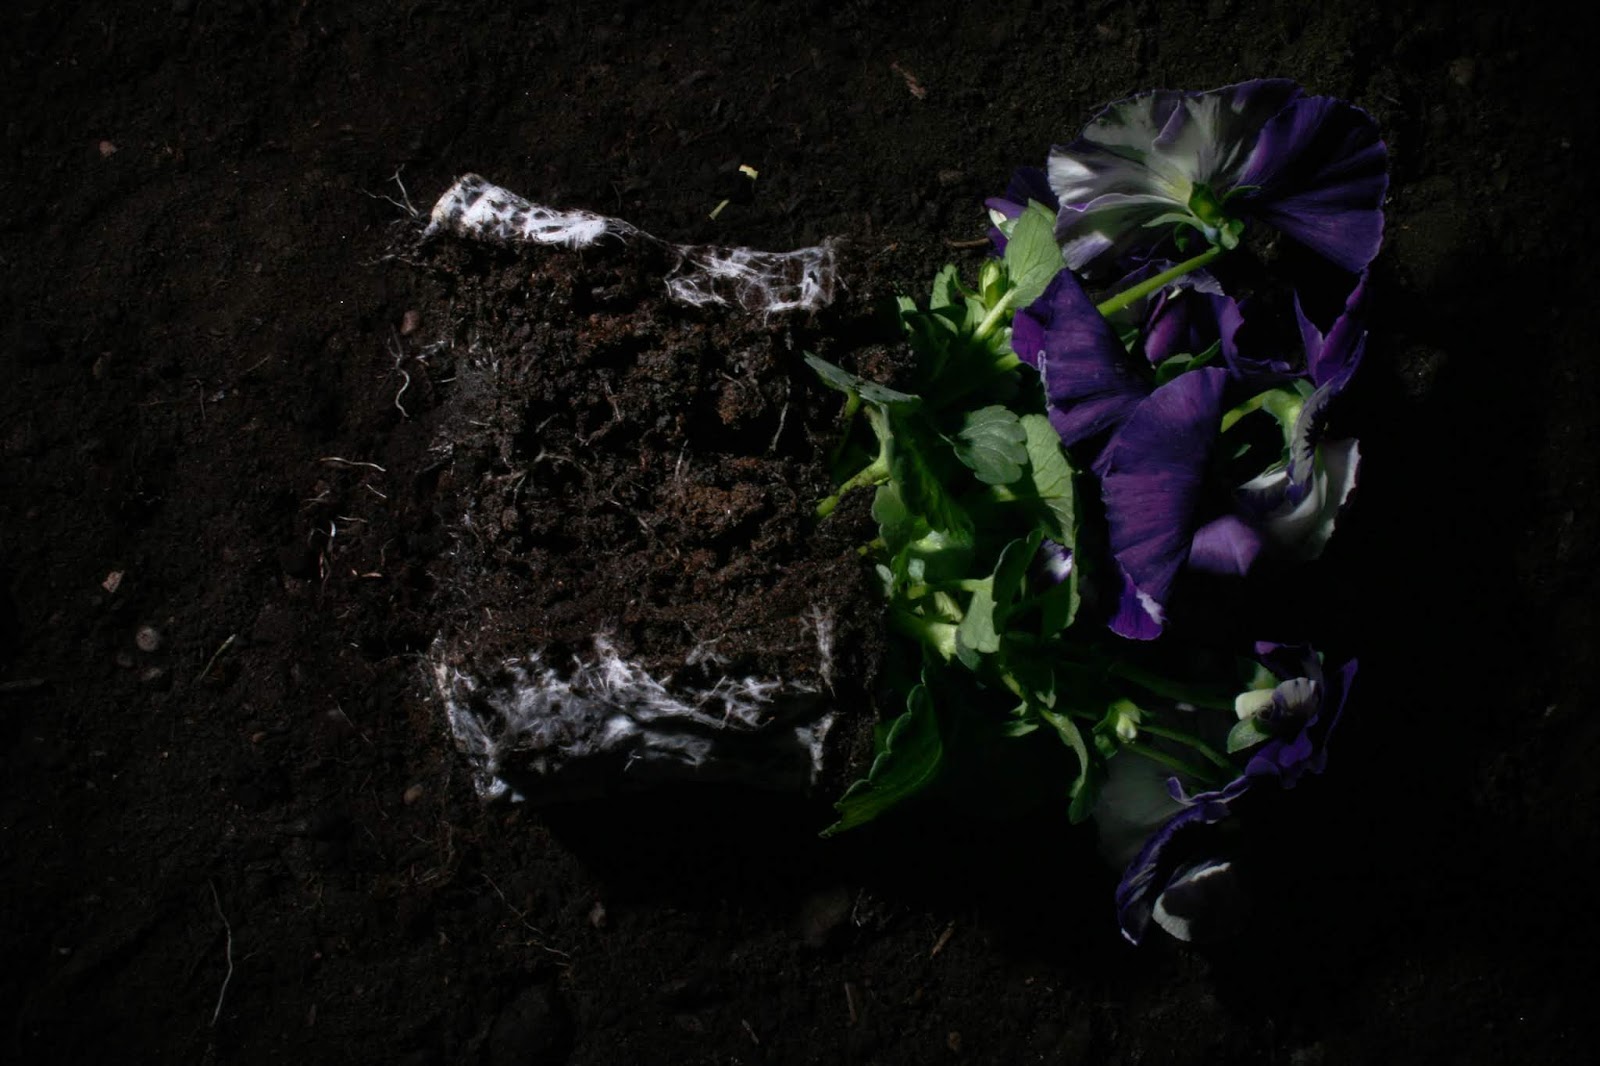
F/22 1/125 ISO 200
I like the image above because of the detail that was captured within the soil of the plant. Although the ligh is focused on the leaves of the plant I would like to brughten up the destructed roots in photoshop because I think this should stand out within the photo.

F/22 1/125 ISO 200
I have chosen this as one of my best images because I feel as though the angle at whichthe photo has been taken makes the plant look slightly distorted. Due to the camera being closer to the bottom of the plant I feel as though this part looks slightly enlarged and therefore stands out. I do feel as though the plant is slightly too dark however this can be fixed using the burn and dodge tool in photoshop.
F/22 1/125 ISO 200
I have chosen the image above as one of my best because I like the perspective the phoot has been taken from. This is not obvious that a plant is being photographed and I think this is interesting because of the way the roots look messy and destroyed.

F/22 1/125 ISO 200
I have chosen this as one of my best images because I like the elements of colour within the photo. I like the way the white roots are still visibld in the photo because I feel as though this has connotations of something that was once alive is now ruined.
Images that require improvement

F/22 1/125 ISO 200
This photo requires improvement due to the image being underexposed. Although all of the photos used the same camera setting I did not use a tripod during this shoot as I wanted to capture anges that were easier to access by shooting freehand. Unfortunately for some of my photos this resulted in me blocking the snoot lighting attachment. This blocked the flash when I fired the camera and resulted in an underexposed photo. Once I realised this was a problem I decided to use a tripod to take some of the photos that required the camera to be very close to the object because then I could stand out the way and allow the flash to work.

F/22 1/125 ISO 200
This photo requires improvement due to the angle that I was taking the photo. I attempted to take the photo with the camera being held above the flower. I adjusted the light so that it was directed on top of the flower however I did not have the correct set up in order for this angle to work. There was not enough light available to reach the flower therefore most of the photo was very dark. I also did not think about the composiiton of the image as the flower is not in the centre of the image and there is a lot of negative space around the flower which I feel takes away the focus from the flower.
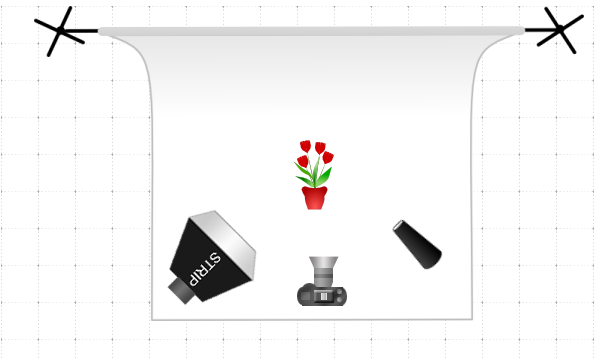
Camera Settings and Techniques
To complete this shoot I used a canon eos 400d. I did not use a tripod for the entire shoot as some of the angles that I wanted to capture worked better when I was shooting freehand. When shooting I began using one softbox light on the left of the setup. This was used to give this side of the image an element of light. I then used a snoot lighting attachment in order to focus the beam of light onto one element of the photo. I used a light meter to test the camera settings with the lighting settings that I used. I then used an f-stop of f/29 for the first coupld of photos that I took. I then felt as though the photos were slightly too dark so I measured the camera settings again and this resulted in me using an f-stop of f/22, which is the f-stop I used for the remainder of the shoot. I then used a shutter speed of 1/125 for the entire shoot. Although there was no movement in the photo I wanted to ensure that I froze action rather than risking any movement in the photo. This was relevent to this specific shoot because I was shooting freehand. This meant that if the shutter speed was too long then my hand may have moved the camera and I may not have frozen the action within the photo. I used an ISO of 200 throughout the shoot. This was because there was no natural lighting within the shoot so it was not bright enough to use ISO 100. Even though when you increase the ISO the quality of the photos decrease, I had to increase the ISO in order to capture photos with an even exposure.
A03
My main inspiration for this shoot came from other photos that I had previously not explored from Nadege Meriau. She completed a series where she photographed different foods like pumpkins and honeycomb and almost made the photos look like a landscape. The perspectives that she took the photos from were very interesting because they made the viewer question what object is actually being photographed. I felt very inspired by this however I also wanted to incorporate elements of her root series. Overall I decided to shoot using soil and plants that had been taken out of pots so you could visibly see their roots however I then manipulated this by placing flowers on top of eachother and turning them upside down. This added an artistic element to the photos which I feel was heavily influenced by Nadege Meriau's work. I have also gained inspiration from a number of photos from online. Two of the images I gained sinpiration from are located below. The main reason that these photos gave me inspiration I could not get from Nadege Meriau's work is because thee plants have been taken standing up. Meriau took all her photos of plants from a birdseye view. I explored this udeaduring my previous shoot in relation to this photographer therefore I wanted to go beyond the photographers ideas and incorporate some if my own ideas within the shoot.


Edits - Burn and Dodge Technique

Firstly I used the curves tool to increase the brightness of the image. I made quite a drastic change in order for me to brighten the image as much as I wanted to.

I then selected 'edit' then 'fill'. I ensured the contents was set to black and pressed 'ok'.

I then used the brush tool and made sure that the colour was set to white. I was then able to lighten certain areas of the photo. I altered the paint brush size depending on what part of the photo I wanted to lighten. This was because in some situations I needed to be slightly more specific. I then lowered the opacity to around 30%. This made it look a lot more subtle.

I then repeated the same process but I altered the curves to make the image slightly darker. I did not need to do this with every photo but for many of the photos there were small areas in the photo that I wanted to add darkness or shadows too to add slightly more depth.

I also used the clone stamp tool to correct some slight incorrections within my photos. In one of the images that I edited there was a leaf in the edge of the image. I used the clone stamp tool to fix this. Below is the before and after of the image that I edited.


I also increased thr exposure slightly for some of the images because I felt as though the entire image was slightly too dark.
My Final Images


No comments:
Post a Comment